As a data person, you’ll find that platform configuration fields are among the most useful features of UKG Pro aka UltiPro. These are user fields on steroids, allowing not only to add data, but to validate that data. In order to validate that data, you’ll generally need to set up a custom business rule. I’m not going to go through all the steps for adding a platform configuration field as there is solid documentation on the web site. However, once you have the field setup, you’ll want to add values. And if you have lots of records to update, you don’t want to do that manually.
In our previous example, we created a list of alternative job codes for reporting to New York State. Anyone who does government, contract or grant reporting of payroll dollars will be familiar with the fact that your funder’s codes will not align with your internal codes. We’ve assigned the platform configuration field to the job code. We are fortunate that we can add the field to the job. Sometimes we need to assign the new value on an employee level. That’s not a technical challenge but it can be a maintenance nightmare.
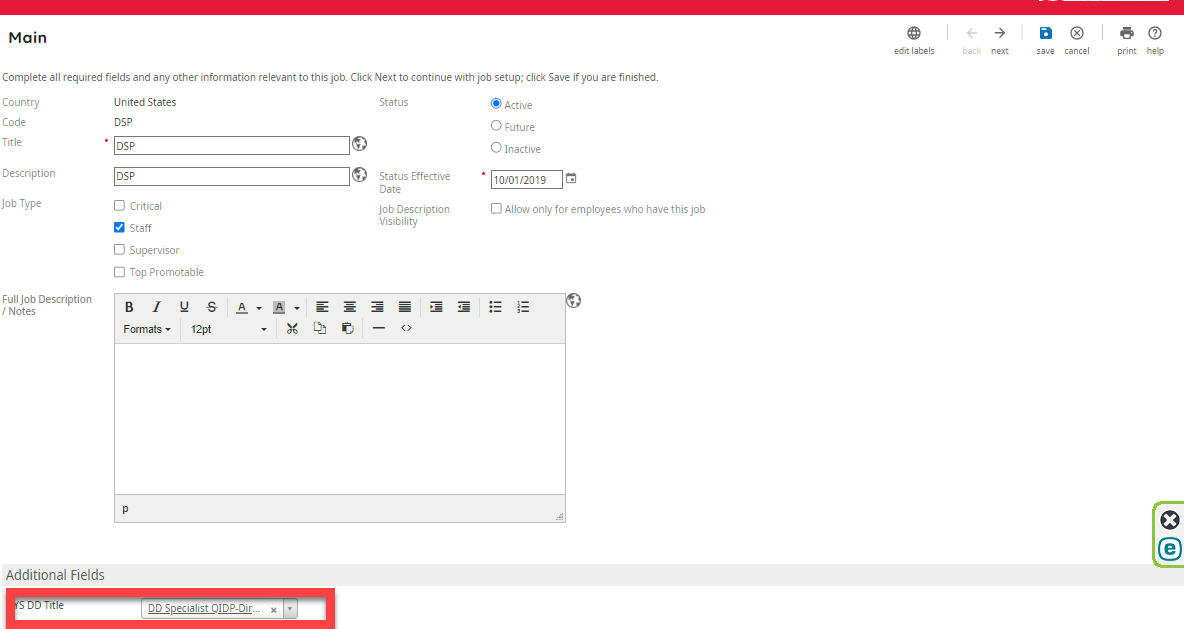
You’ll see how we’ve mapped the internal Job of DSP to DD Specialist. (As an aside, once you start working with platform configuration fields, you’ll wonder how you lived without them).
For your reference, UKG does provide documentation for importing these values. However, I spent a good bit of time figuring out all the steps – thus this post.
Prepare Your CSV File
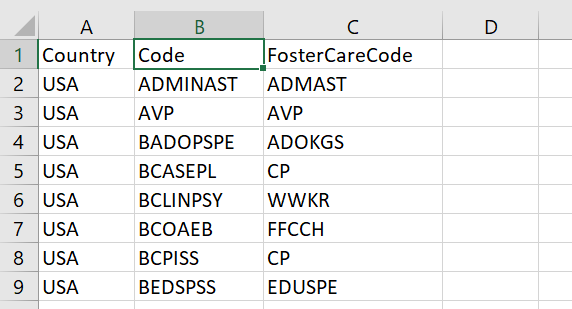
Before starting work in UltiPro, you should prepare your csv file mapping your job codes to the new codes you’ve setup in your simple business rule.
At a minimum, you’ll need to have the job code and the code for the platform configuration fields. Values which are the same on every record can be supplied in the mapping and left out of the file. Here’s our example file. We’ve included the country code which could have been defaulted in the file mapping.
Business Rules Import -> Configuration
Now we can start in UltiPro. We’ve already setup our Platform configuration field. We just need to find the ID the system assigned to it. To do so, go to configurations under Business Rules Import and click on PC fields in the upper right corner. This will get you the necessary ID which you’ll use in the next step. Note that it took some time after setup for the value to appear in the screen.
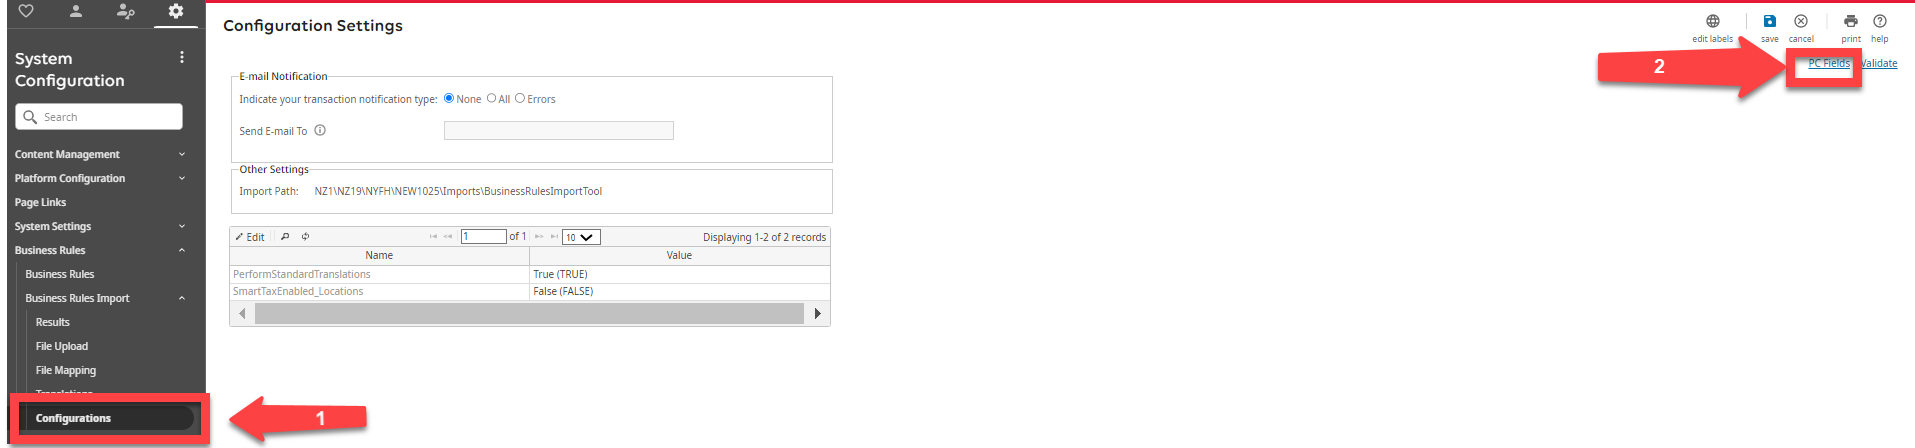
You can search for the field you’ve setup – in this case Foster Care Title.

The value in this case is _BFosterCareTitle.
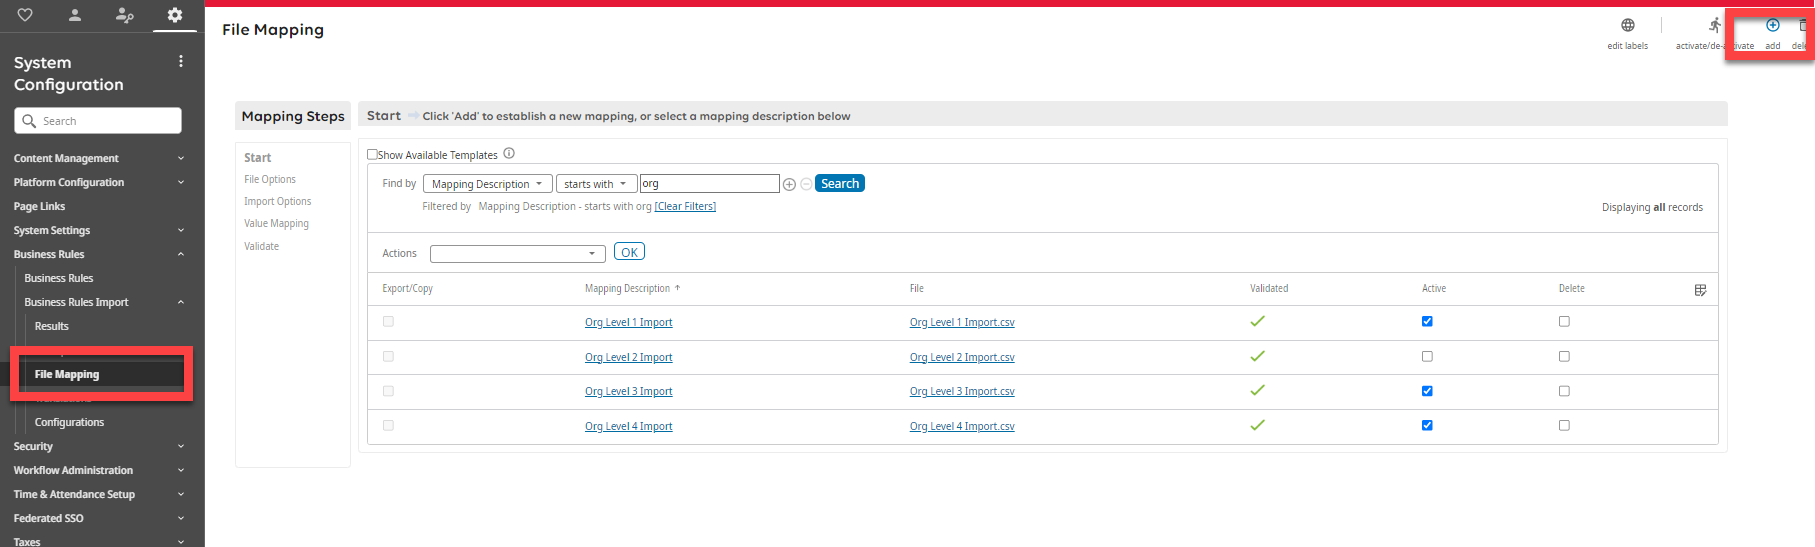
Business Rules -> File Mapping
Now we have to map our csv file. Go to Business Rules Import-> File Mapping and click add in the top right corner.
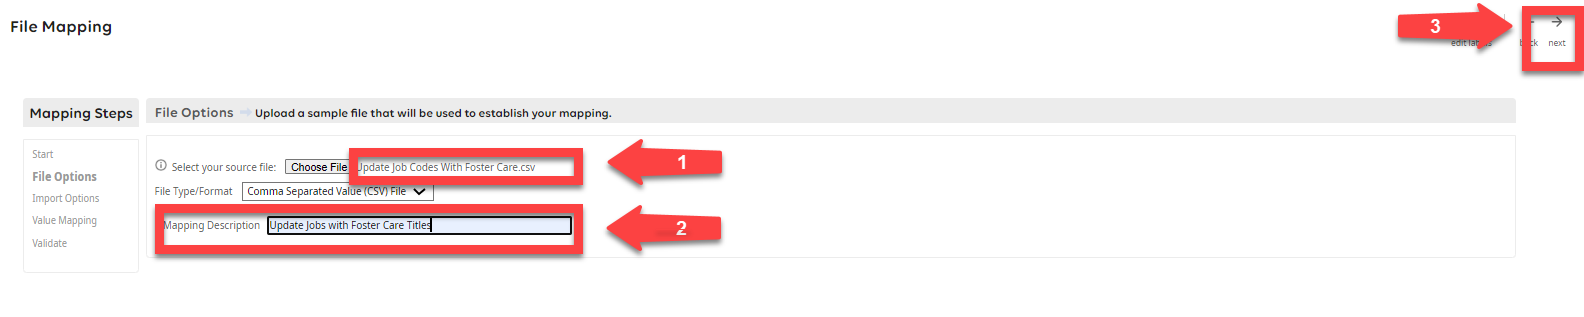
File mapping – choose File
Click Choose File to Find the file you created above.

You can then find the file you created on your PC.

After you select your file, you’ll see the name updates on the screen. You can then enter a name for the mapping. Clilck next to get to the next screen Import Options:
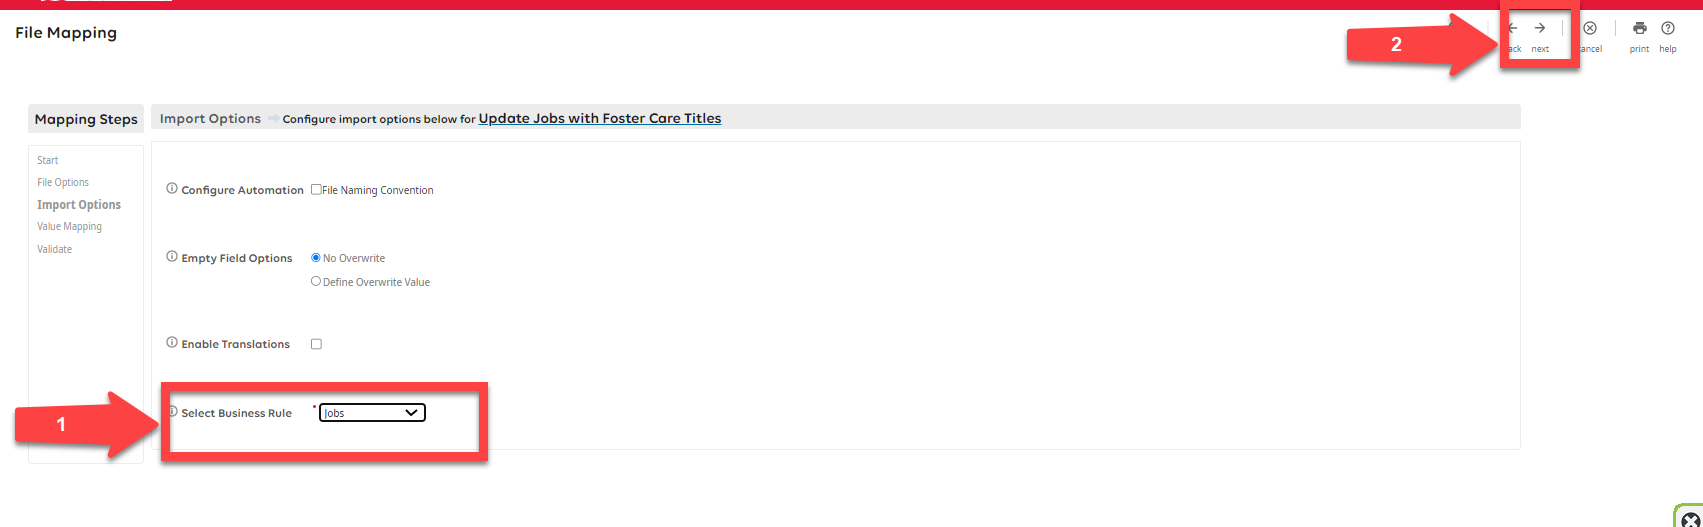
Import options
We’re not worried about automation at this stage. So, simply select Jobs for the business rule (as we are adding values to the Job) and click next.
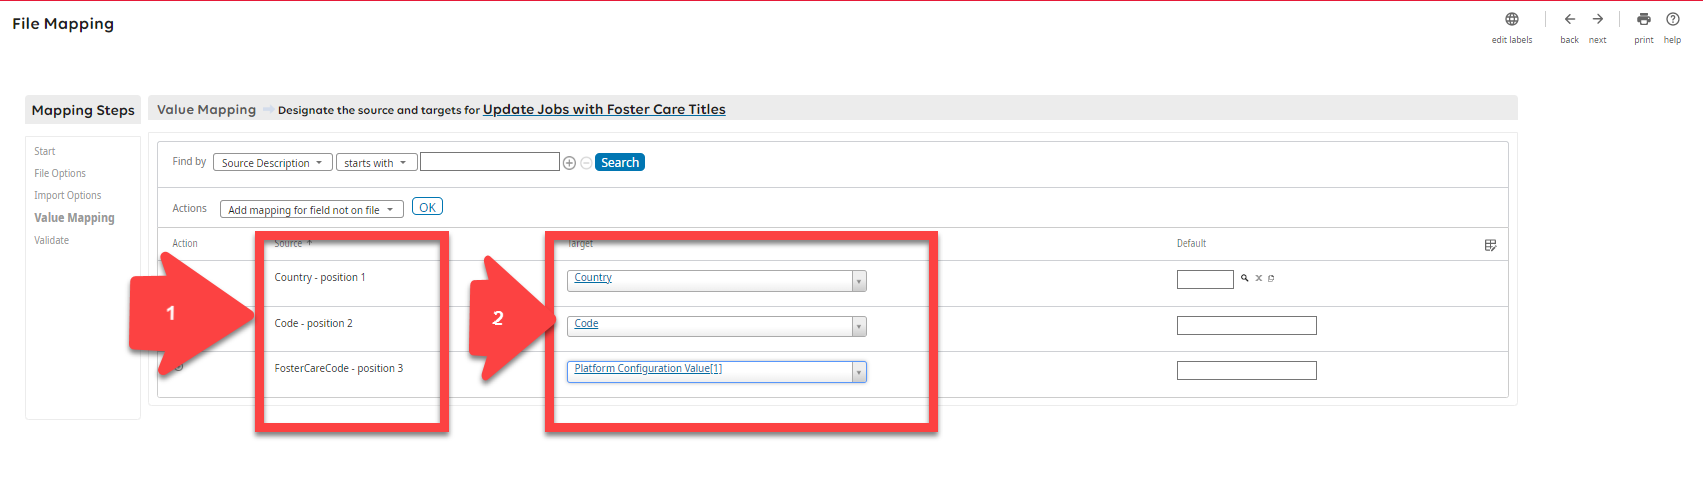
Map Fields
On the next screen, you’ll see the three fields from your file appear.
You’ll need to select the appropriate mapping for each column.
You’ll see that this is fairly straightforward.
|
Source |
Target |
|
Country |
Country |
|
Code |
Code |
|
FosterCareCode |
Platform Configuration Value 1 |
You may ask – how does the system know which platform configuration field you’re updating? Good question. That’s why we got the _BFosterCareTitle ID value above.
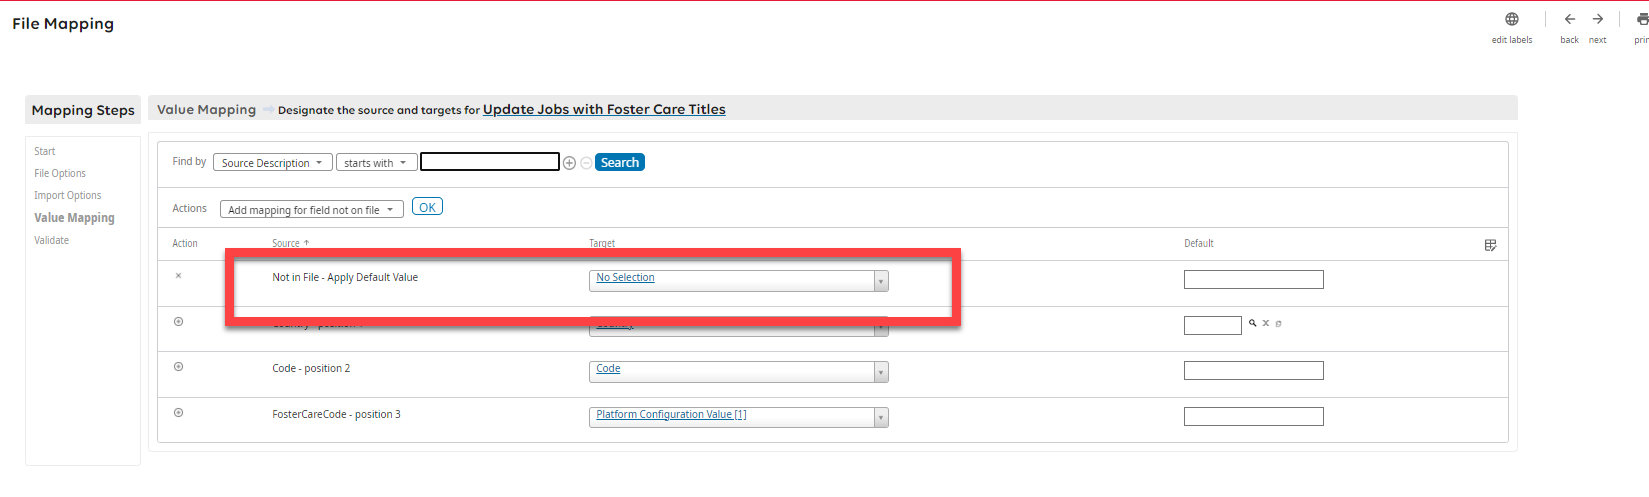
We need to “Add mapping for field not on file” twice. Choose this option under for the action and click OK.
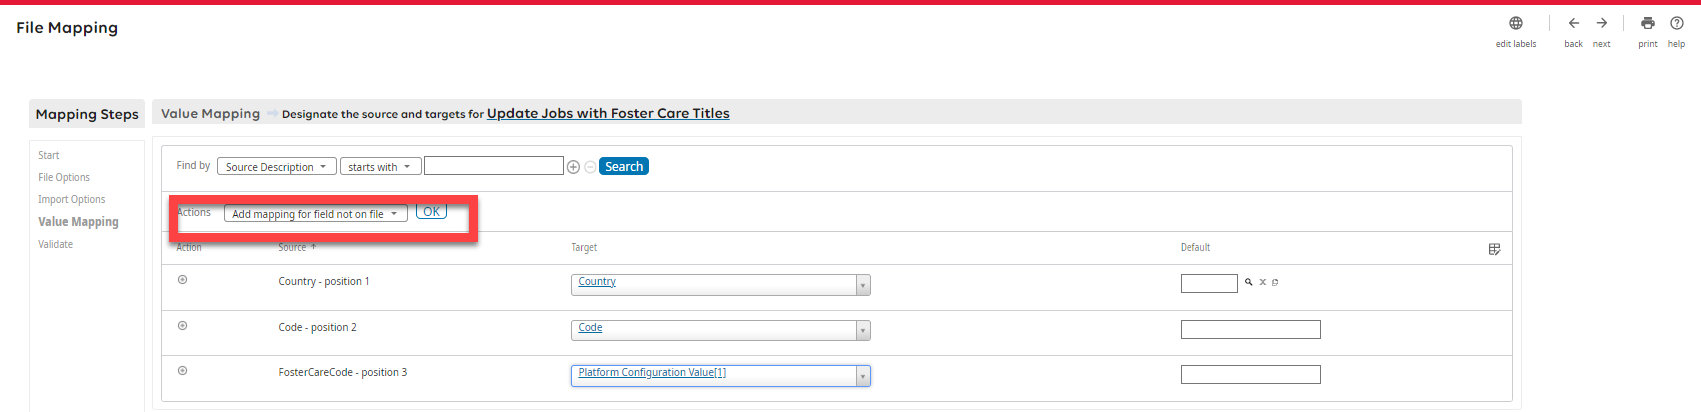
A new line will appear with the Source of “Not in File – Apply Default Value”.
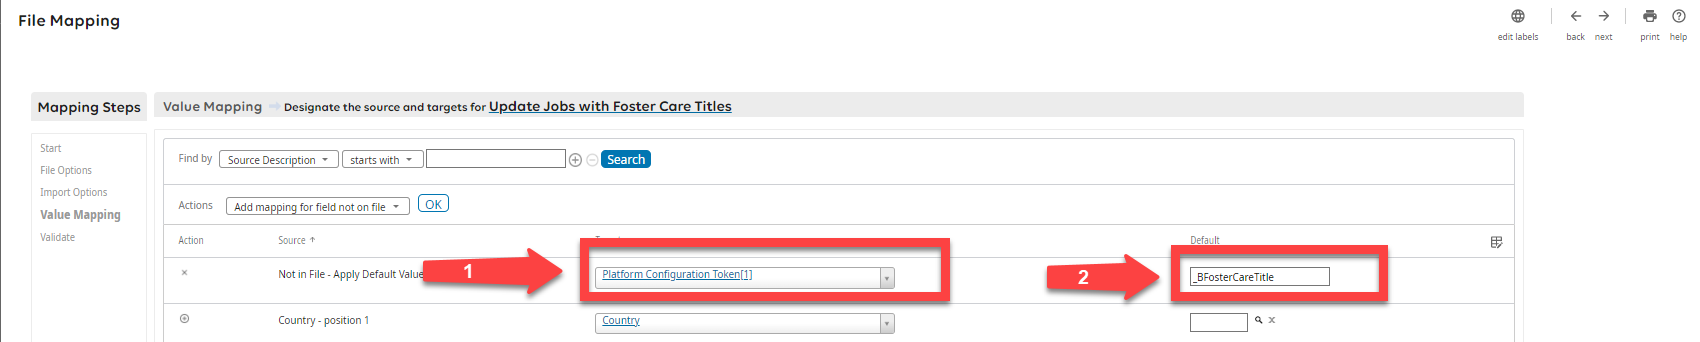
You’ll enter “Platform Configuration Token[1] and supply the default value of _BFosterCareTitle.
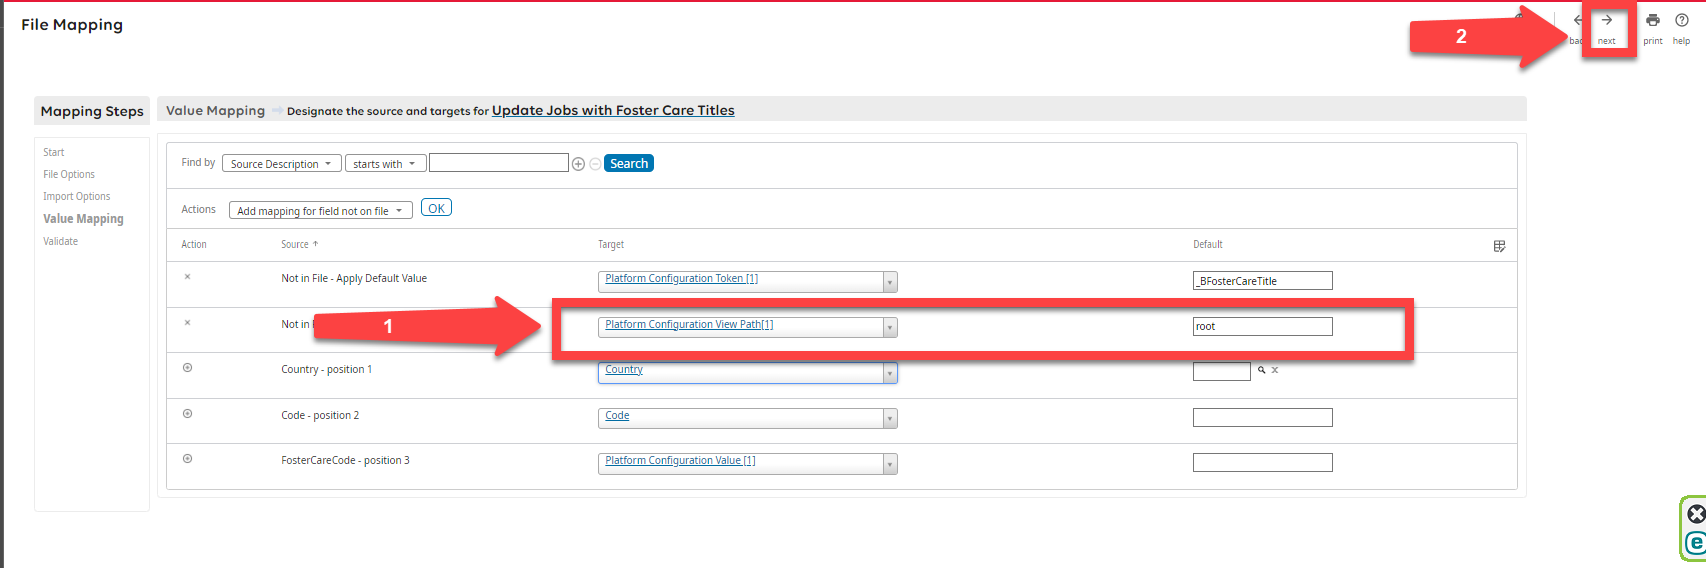
You’ll need to repeat the same steps once more. This time you’ll add the target of Platform Configuration View Path[1] and the value of root. Then click next:
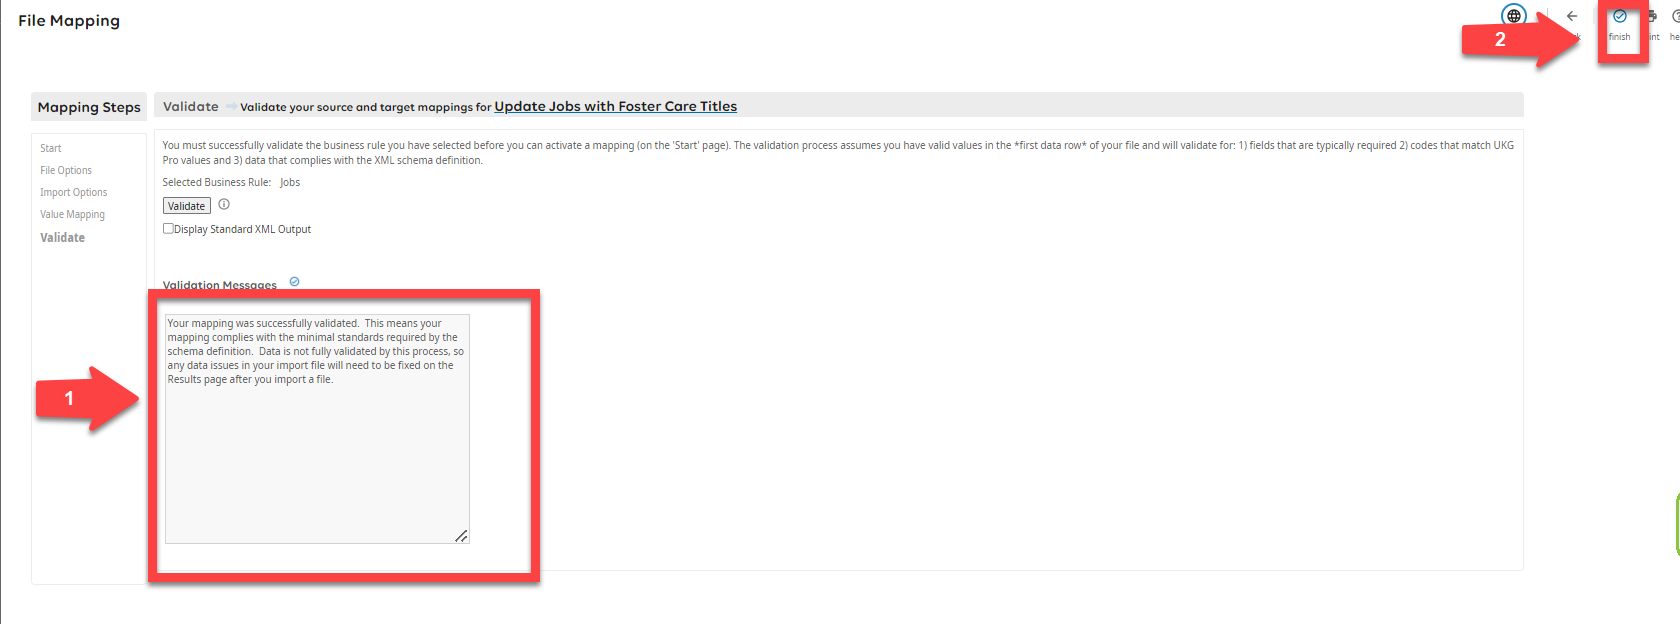
Validate
This will bring you to the Validate page. Click Validate:
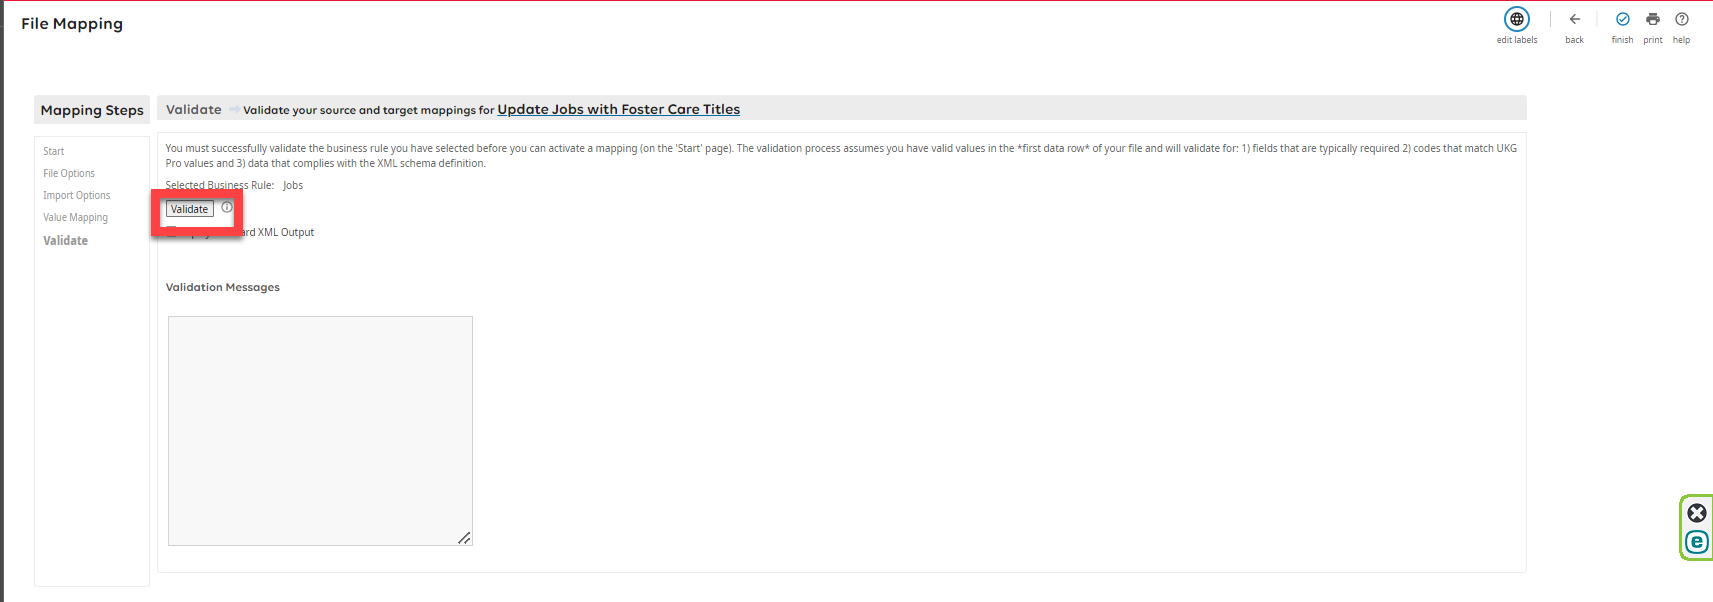
And if everything worked, you should get a positive message and you can click finish.
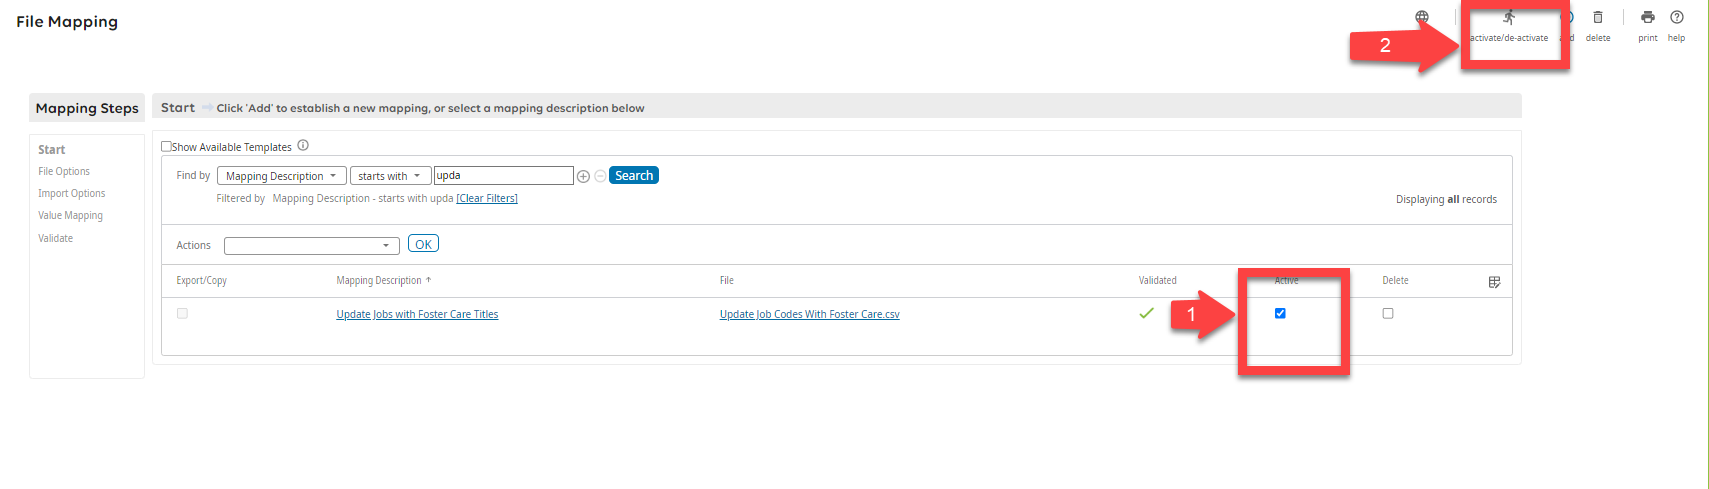
Making your mapping active
You’ll then return to the list of mappings.
After validation, the mapping is still not active which means it won’t work.
Find your mapping. Check the active box. Then click activate/de-activate in the top right corner
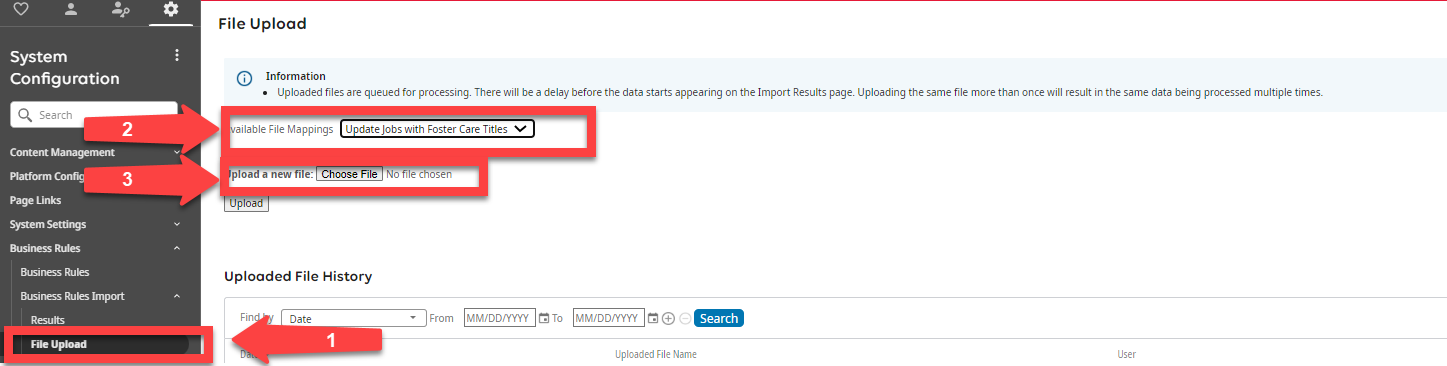
File upload
You have your mapping. You can actually update the values in the system.
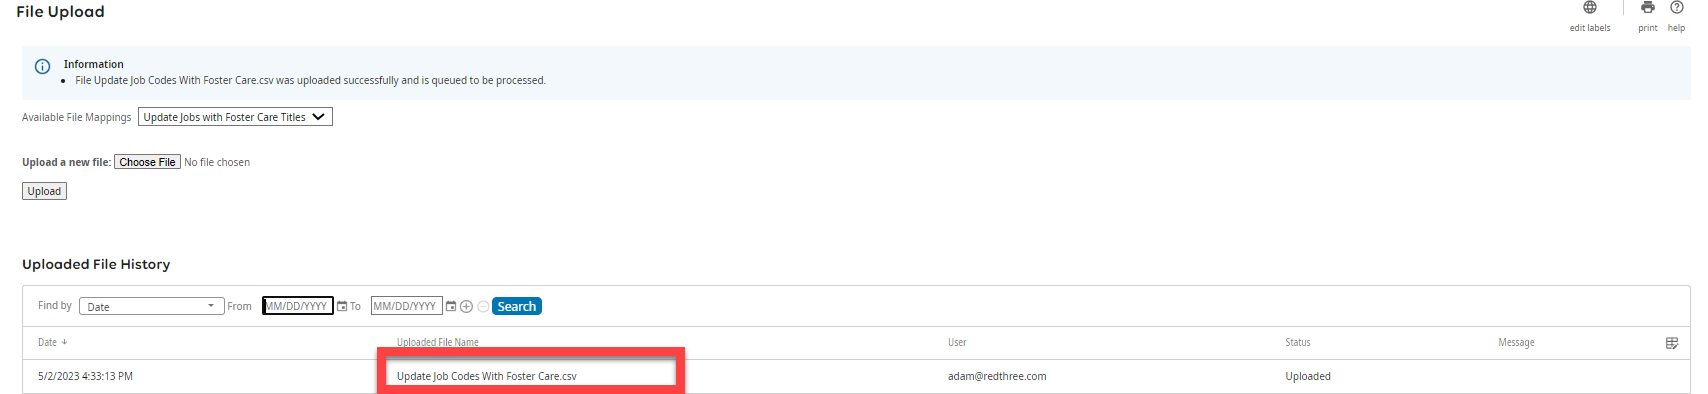
You’ll start on the field upload page. Choose your mapping and click choose file. You’ll select the same file you chose before. In the future, you can use any other file name as long as the column layout remains the same.
You’ll see the file name appear. You can click Upload.
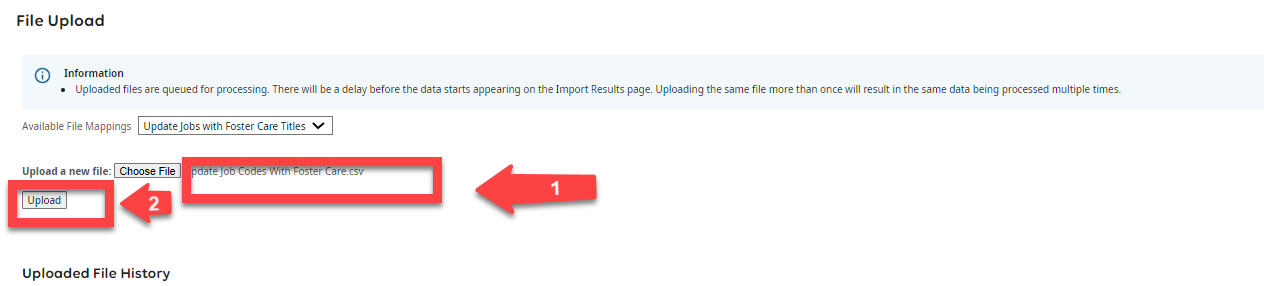
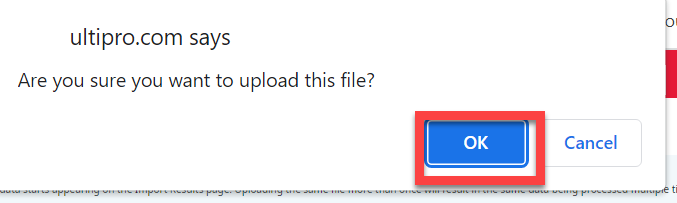
Ultpro will ask if you’re really serious. (And if you’ve spent this much time doing this, you are.) Click OK.

And you’ll see the file show up with status uploaded.
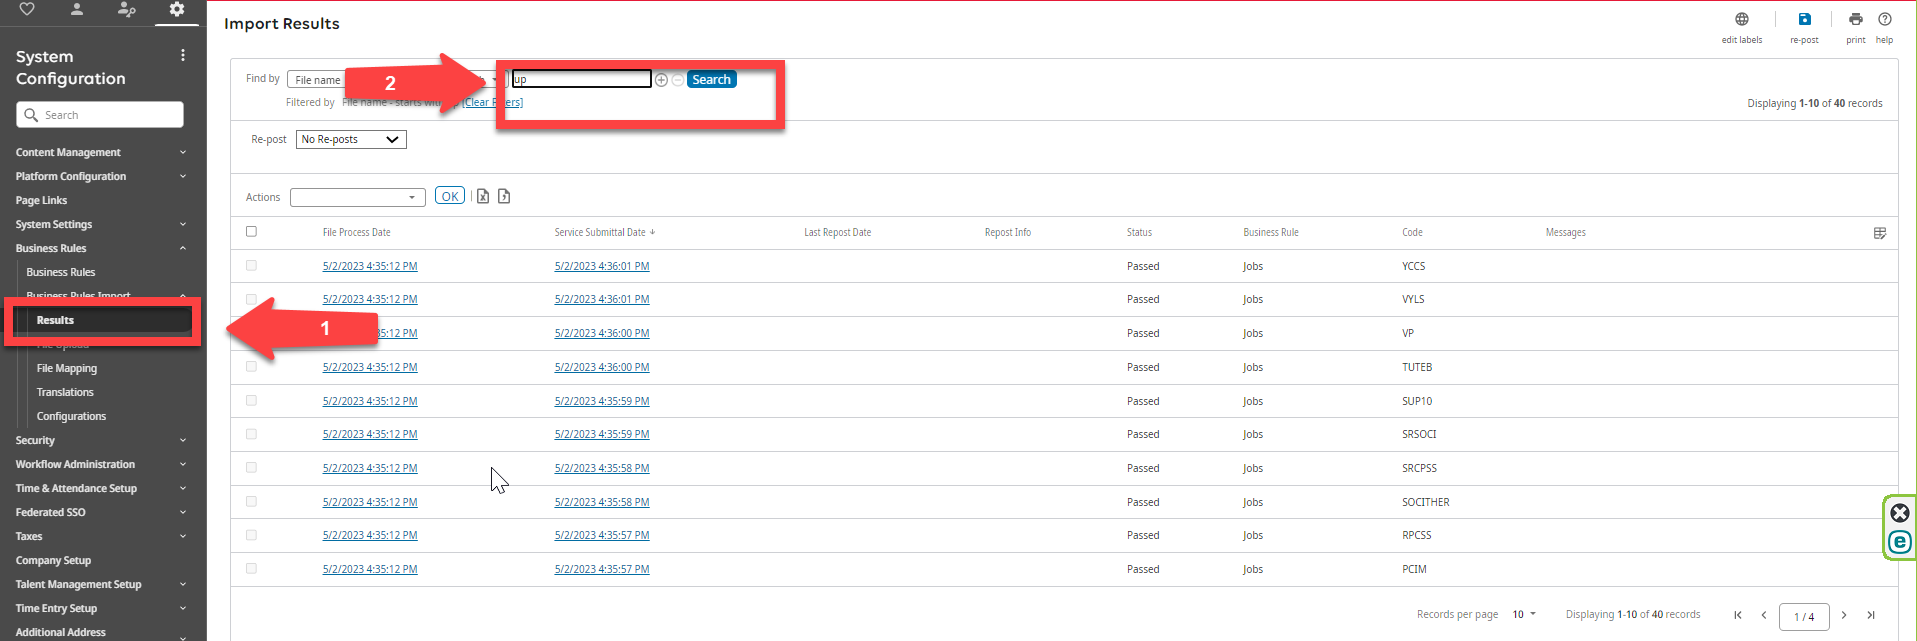
It will take a few minutes for the process to run. If you go the Results page and search for your file name, you can see the results for every value in your file.
I hope this was helpful. If you have any questions, please comment below.
If you’re interested with help with Data Integration and Analytics, contact us.