It’s easy to setup a simple business rule in UKG Pro. And if you don’t have that many values to enter, it’s not a big deal to enter them by hand.
But if you have dozens of possible values, this isn’t so easy. Especially if you are working in test and eventually want to move to production without repeating all your work.
You can use the Business Rules Import. Unfortunately, you need to use XML and not CSV format.
The good news is that a few lines of PowerShell can turn any CSV file in to the necessary XML format. We’re happy to send you our sample code.
I’m using a real-world example. For our client, we needed to map internal Job codes to job codes used for certain NYS reporting. We’ve set up a business rule for all the NYS titles.
Let’s call this “New Business rule”.

And add a sample code:

Now we are ready to upload our data. For your reference, the documentation on this process can be found here on the UKG Ultimate Community Portal —How to Import into Simple Business Rules.
We won’t review the details covered in the article. We’ll just focus on how our PowerShell script creates the XML from the CSV.
We start with our list of codes in a csv file. You’ll note that we have titled the columns rule code and description to make the PowerShell code as self-documenting as possible.

Here’s a sample of what that CSV will look like in XML.
<Transactions>
    <Transaction>
        <Header>
            <TransactionType>SIMPLERULE</TransactionType>
            <BusinessRule>CO_NEWBUSINESSRULE</BusinessRule>
        </Header>
        <SimpleRule>
            <RuleCode>BHS1</RuleCode>
            <Description>Behavior Intervention Specialist 1</Description>
            <CountryCode>USA</CountryCode>
        </SimpleRule>
    </Transaction>
    <Transaction>
        <Header>
            <TransactionType>SIMPLERULE</TransactionType>
            <BusinessRule>CO_NEWBUSINESSRULE</BusinessRule>
        </Header>
        <SimpleRule>
            <RuleCode>BHS2</RuleCode>
            <Description>Behavior Intervention Specialist 2</Description>
            <CountryCode>USA</CountryCode>
        </SimpleRule>
    </Transaction>
</Transactions>
Code language: HTML, XML (xml)
There are only four fields that can change:
Three are obvious:
RuleCode An up to Six digit unique code for the value we want.
Description The description of the code.
Country For this example, it’s always USA.
Business Rule:
In the application, we called the business rule “New Business Rule”.
UKG Pro removes all the spaces and prefixes the remaining name with CO_ to create a table name. So, in our case the business rule is CO_NEWBUSINESSRULE.
If you’re unsure about the name, we’ve included a simple People Analytics Report which will allows us to confirm the name. Indeed, the reason we added that simple code is to allow our report to work before we import values. Here’s what the output looks like.

The PowerShell:
Here’s the sample code.
- To keep this simple, I’ve hard coded the BusinessRule name. This could be made into a parameter.
- The script expects a csv file called Simple Rule Source.csv to exist in the same directory as the script.
- The script creates an XML file Called Simple Rule for Upload.xml. Note that the script will overwrite any existing file.
Again, you’ll find all this in Git Hub.
Set-StrictMode -Version 3

[string]$BusinessRule = "CO_NEWBUSINESSRULE"
[string]$File         = Join-Path $PSScriptRoot "Simple Rule Source.csv"
[string]$OutputFile   = Join-Path $PSScriptRoot "Simple Rule For Upload.xml"
[array]$Records       = @()
[object]$Record       = $null
[string]$RuleCode     = ""
[string]$Description  = ""

out-file $OutputFile

add-content -path $OutputFile "<Transactions>"

$Records = import-csv $File

foreach($Record in $Records) {
   $RuleCode = $record.RuleCode
   $Description = $record.Description
   add-content -path $outputFile `
"    <Transaction>
         <Header>
             <TransactionType>SIMPLERULE</TransactionType>
             <BusinessRule>$BusinessRule</BusinessRule>
        </Header>
        <SimpleRule>
             <RuleCode>$RuleCode</RuleCode>
             <Description>$Description</Description>
             <CountryCode>USA</CountryCode>
         </SimpleRule>
    </Transaction>"

}
add-content -path $OutputFile "</Transactions>"

Code language: PHP (php)
Once you have the PowerShell, you’ll have your output file which we call Simple rule for Upload.xml. You can simply use Business Rule Import – File Upload to load this data.
Note that as this is an XML file, no mapping is required.
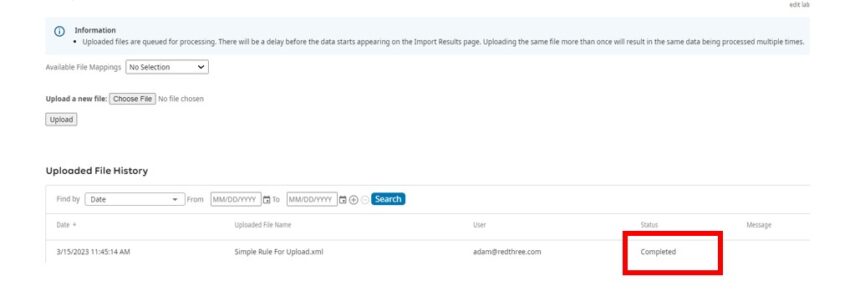
Simply choose a file name and click upload.
After you click upload, the file name will show as uploaded.

You can refresh the screen until the status changes to completed.

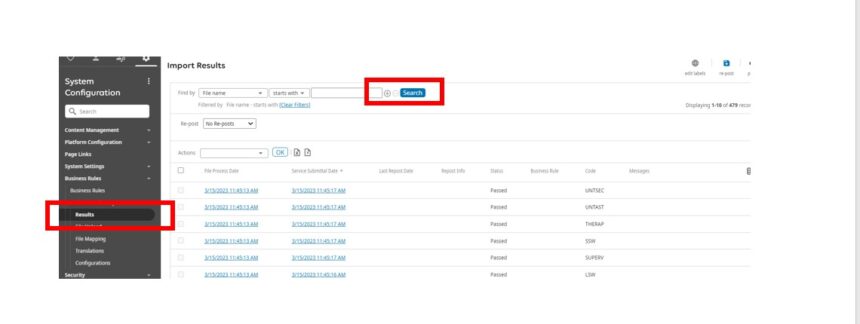
You can then choose results to confirm that everything loaded successfully. Note that you’ll have to click search to display the information.

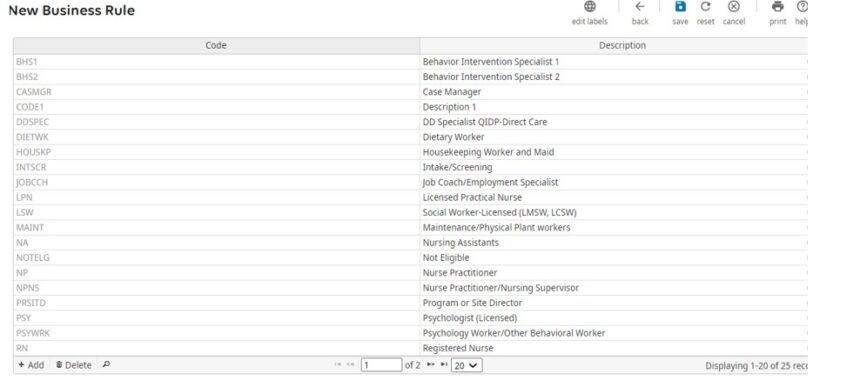
If you switch back to business rules, you’ll see your values:

Once these values exist, you can then attach them to a Platform configuration field and assign them to the appropriate object. But that’s a separate blog post.
Let us know if you have questions in the comments below. Or contact us if you have data integration and/or analytics questions around UKG.